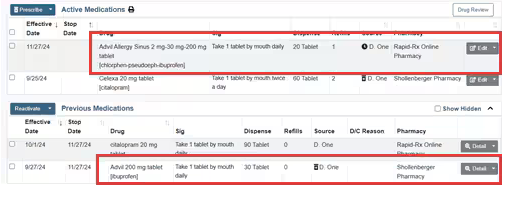
This article will cover:
- How to Request a Patient’s Surescripts’ Prescription History
- Patient’s Surescripts’ Prescription History is greyed out
- How to Manually Add an Active Medication
- How to Discontinue an Active Medication
- How to Edit an Active Medication
- How to Renew a Prescription
- How to Cancel a Prescription
- Replace an Active Medication
First login to your iCoreRx site, select a patient and navigate to the Compose Rx page
How to Request a Patient’s Surescripts’ Prescription History
This feature enables the system to access the SureScripts Benefit Drug History and display an “All Doctors” medication list.
NOTE: Surescripts Drug History results are for guidance and should not replace your normal Medication Reconciliation process with the patient.
Not all patients will have a match for Surescripts Drug History.This is usually due to a discrepancy between the information sent to be verified and what the PBM holds for the patient. In order for Surescripts to return prescription history information, the following criteria must match: First Name, Last Name, Date of Birth, Gender, State and Zip Code.
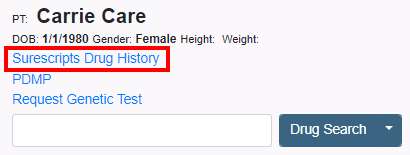
1. From Compose Rx, click Surescripts Drug History link located under the patients name on the left
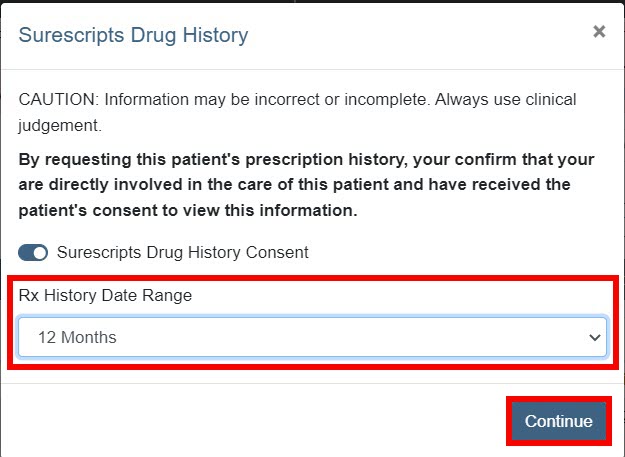
2. Select Rx History Date Range
3. Click Continue
Take note of CAUTION displayed at the top of the page.
4. The results will be displayed.
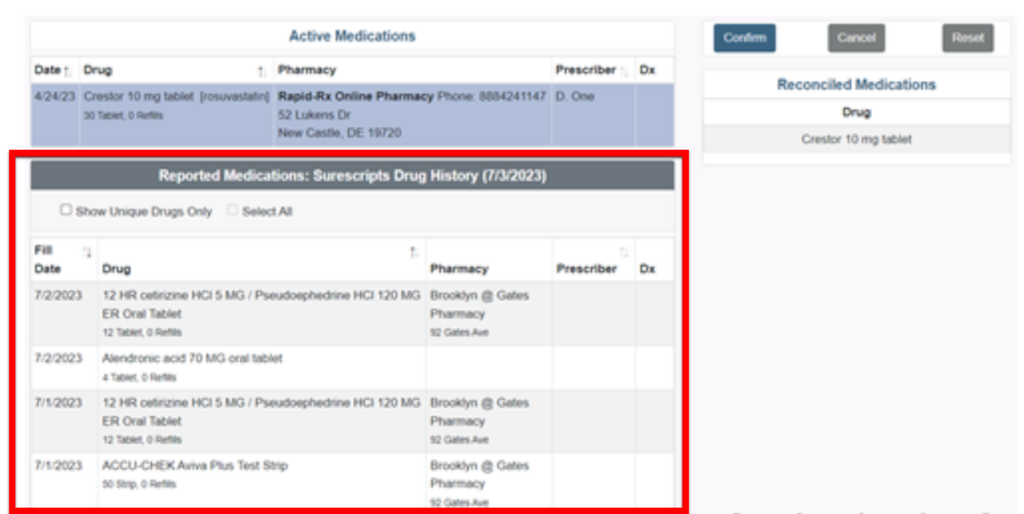
5. There a 2 options to Add any current medications to the patient’s chart
Option 1. Select a Single prescription by clicking on the medication in the Medications table. Once clicked the medication is highlighted blue and displays on the Medications list. Repeat to add additional medications.
Option 2. Check the box Show Unique Drugs Only and then click the Select All checkbox. All the medications will be highlighted blue and display on the medication list.
NOTE: This option eliminates listing multiple fills of the same prescription. This is used for patients with a long prescription history. The Select All checkbox is only active after the Show Unique Drugs Only checkbox is selected
6. Select the Confirm button the Medications list to add the selected prescriptions the patient’s Active Medications list
Patient’s Surescripts’ Prescription History is greyed out.
1. Not all patients will have a match for Surescripts Drug History.
This is usually due to a discrepancy between the information sent to be verified and what the PBM holds for the patient. In order for Surescripts to return prescription history information, the following criteria must match: First Name, Last Name, Date of Birth, Gender, State and Zip Code.
2. Surescripts Drug History will not display if Cash Only/No Coverage Checks is selected under Prescriber Settings.
Follow these steps below to check the Cash Only/No Coverage settings:
a. Go to the Admin tab
b. Under Account Configuration, on the left menu, Select Account Settings.

c. Under Workflow Options, Un-select Cash Only/No Coverage Checks.
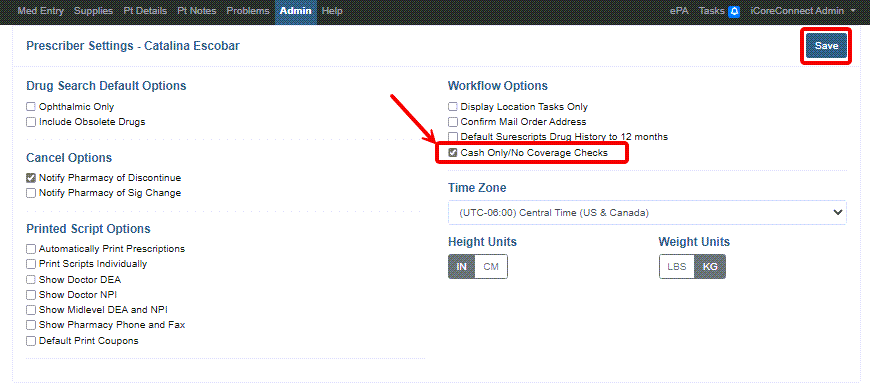
d. Click Save.
How to Manually Add an Active Medication
1. Click the Med Entry tab in the top menu bar on the left
2. If known, enter the Outside Prescriber Name and Original Prescription Date
| Quick Tip: |
|---|
| If the Outside Prescriber Name and Original Prescription Date are unknown, leave these fields blank. The Prescriber Name will default to the logged in provider and the Date will default to the current date. |
3. Enter drug name and click blue Drug Search button
4. Select the Dosage Strength and Form
5. If known, click the Edit button on the right to adjust the quantity and frequency
6. Click the Down Arrow next to the blue Queue Rx button, then select Record
The medication will now appear in the Patient’s Active Medications list.
How to Discontinue an Active Medication
1. Under Patient’s Active Medications List, click Down Arrow next to Edit button located to the right of the medication, then select Discontinue
2. In the pop window that appears, click the “Yes, Discontinue” button
The Medication is discontinued and has been removed from the Patient’s Active Medications list.
NOTE: This will not cancel a prescription transmitted to the pharmacy; it will only remove from the Patient’s Active Medications List.
How to Edit an Active Medication
1. From Compose Rx, select the medication in the Active Medications list and click Edit button located to the right of the medication.
NOTE: To view the Prescription History, click the Edit Down Arrow and select Details.
2. Adjust the Sig Information as needed.
| Quick Tip: |
|---|
| The dispense information cannot be edited if the prescription is in the Active Medications list, as the patient may already have picked up the prescription. Likewise, changes to Quantity or Frequency will not recalculate the Dispense Quantity. |
3. Click Update to save the new directions.
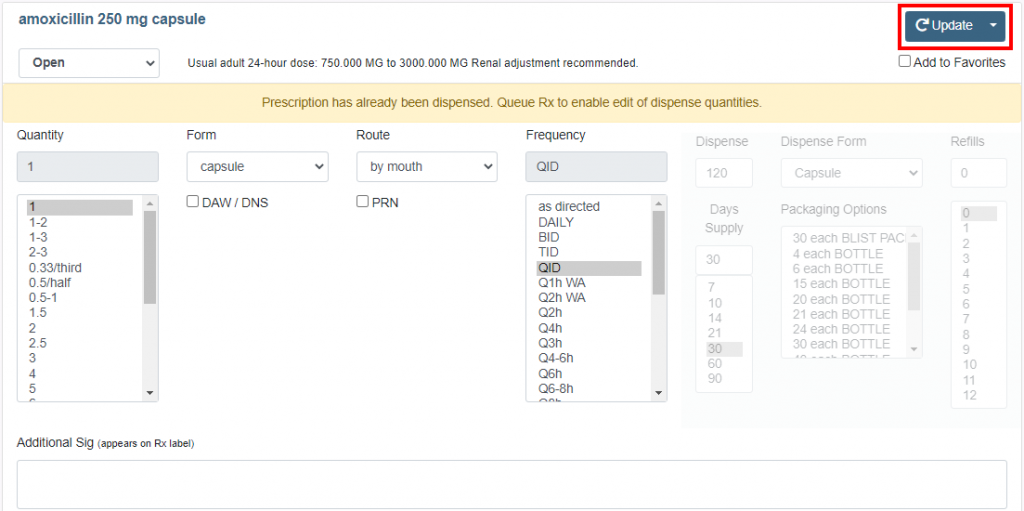
To send the new version of the script to the pharmacy, select Prescribe from the Update button drop-down. Alternatively, select Queue Rx from the Update button drop-down to move the script to Pending status.
4. If the prescription was previously transmitted and there are refills on file, the user will be prompted to notify the pharmacy of the change. Click Yes to notify the pharmacy. Click No to return to the Compose page without notifying the pharmacy.
How to Renew a Prescription
1. From Compose Rx, navigate to the Active Medications list.
2. Select the Checkbox next to the the prescription(s) to renew.
3. Click the Prescribe button to launch the transmit page.

| Quick Tip: |
|---|
| A prescription must be complete to be transmitted. Edit the Sig directions as needed by clicking the Edit button and then proceed to click Prescribe. |
4. Review drug Interactions and Alerts, if applicable.
5. Review the Prescription Directions. This information will be sent to the pharmacy exactly as it is written here. The Effective Date of the prescription is shown on the left and can be modified.
The Detail button links to the full details of the prescription as it will be sent to the pharmacy
6. Review the selected pharmacy and click Transmit.
7. Verify you receive a Transmission Receipt as this means the prescription was resent to the pharmacy.
How to Cancel a Prescription
1. From Compose Rx, under the Active Medications list, click the Drop Down arrow next to Edit button.
2. Click Detail to open the Rx Details page.
3. Click the Cancel Rx button.
| Quick Tip: |
|---|
ONLY SELECT PHARMACIES SUPPORT ELECTRONIC CANCELLATION
If the Cancel Rx feature is not offered at the pharmacy selected, the cancel option will appear to be greyed out. Contact the pharmacy directly to cancel the prescription. |
A confirmation will display to indicate the cancellation has been sent to the pharmacy.
Replace an Active Medication
1. From Compose Rx, under the Active Medications list, click the Drop Down arrow next to Edit button.
2. Click Replace to open the Rx Details page.
3. Fill in the Sig Instructions and Dispense Information, then click the Prescribe button.

4. Review Benefits and Coverage Information, if applicable, then click the Continue button.

5. Click Transmit button to send the new prescription to the patient’s pharmacy.
6. Navigate back to the Compose Rx page to review your changes.
- The new prescription displays on the Active Medications list and the original prescription displays on the Previous Medications list.
