
Step-By-Step guide – how to register a Provider in iCoreOS with ID.me for Rx (e-prescribing) and Rx with EPCS (e-prescribing controlled substances).
Follow the steps below:
- Sign In to iCoreOS
- Search and Select a Patient
- Start ID.me Verification
- Upload Images of Driver’s License, Passport or State ID
- Verify your personal information
- Video Selfie and Liveness Detection
- Add your Medical Information
- Link and Allow iCore
- Admin Approval Required by iCore Representative
- Finalize EPCS Registration
- Start Prescribing
Sign In to iCoreOS
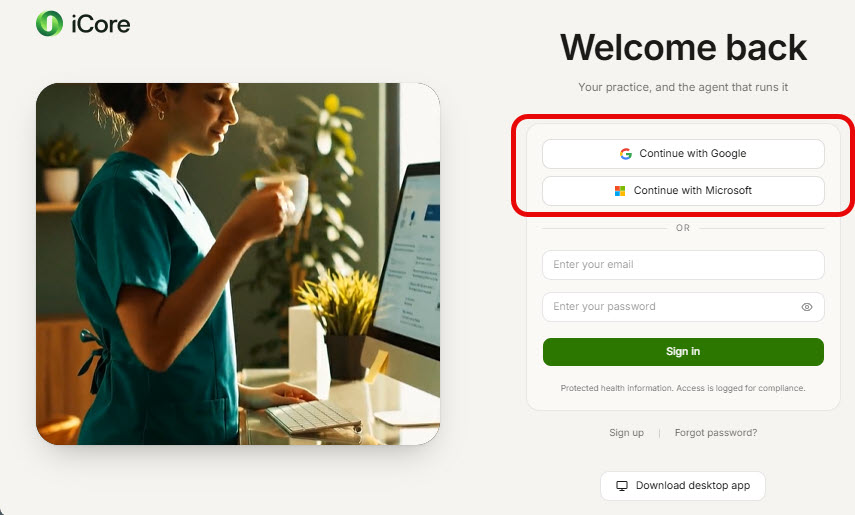
Login to iCoreRx at os.icoreconnect.com.
1. Click either the Continue with Google or the Continue with Microsoft button
2. You will log in using the unique email address you provided to us (Gmail or MSN)
Search and Select a Patient
Search and Select a Patient
1. Search and Select a patient from the schedule or patient database.
- From the Schedule: double click the patient block, then click ‘Prescribe’ button at bottom of the patient record
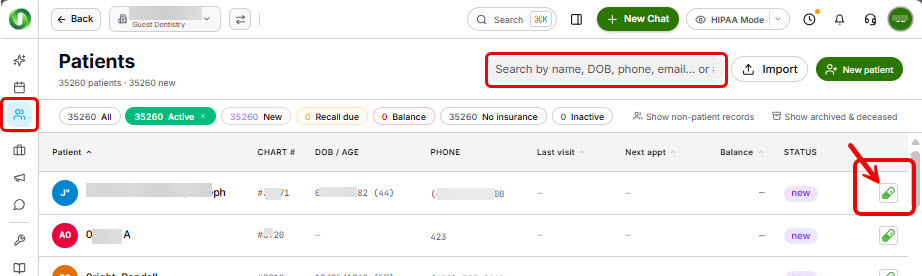
- From the Patient Database: click the green pillbox on the far right of the patient’s name.
Start ID.me Verification
Start ID.me Verification
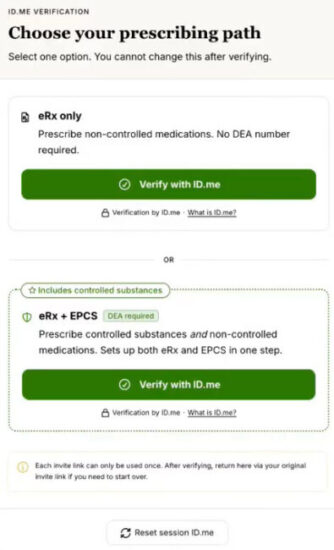
1. To start ID.me verification process you will be given 2 options
- Non-controlled substances (eRx only): click the top Verify with ID.me
- Controlled Substances (eRx + EPCS): click the bottom Verify with ID.me
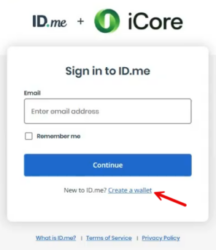
2. Sign into your ID.me account
If you do not have an account with ID.me…
- Click the Create a wallet link
- Follow prompts to create an ID.me wallet or account
- Once created, proceed to step 3, to start Identity Verification
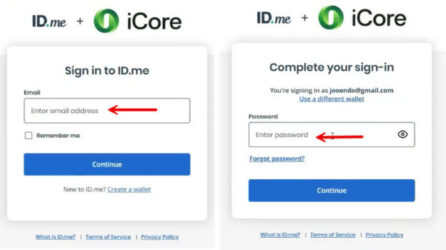
If you already have an account with ID.me…
- Enter your email address,used for ID.me account, click Continue
- Enter your ID.me password, click Continue
- You will be prompted to select your MFA / 2FA option to complete your sign in
- If you previously completed the ID Verification portion, you will see the following prompt, proceed to step 19
- If you previously completed both Identity Verification and added your Medical information, you will get the following prompt, proceed to step 25
Upload Images of Driver’s License, Passport or State ID
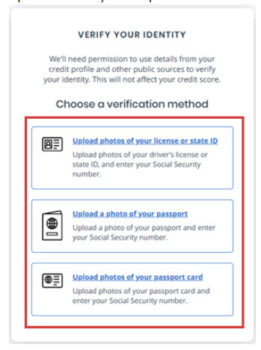
3. Choose a Verification Method
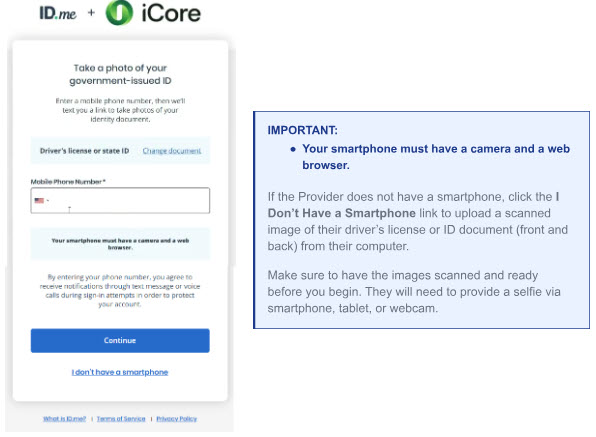
- This could be the Provider’s Driver’s License or State ID, Passport, or a Passport Card.
- Driver’s license, Passport or State-issued ID to verify their identity
- A smartphone to take photos of ID document and a self-image or selfie.
- ID.me will also ask for permission to use details from your credit profile and other public sources to verify your identity. This will not affect your credit score.
| IMPORTANT: Provider will need the following: |
|---|
|
If the Provider does not have a smartphone, they can upload a scanned image of their driver’s license or ID document (front and back) from their computer. Make sure to have the images scanned and ready before you begin. They will need to provide a selfie via smartphone, tablet, or webcam. PLEASE NOTE: |
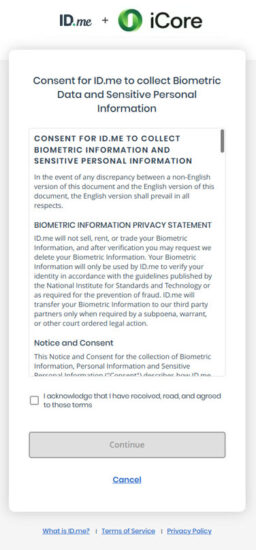
4. Click the I acknowledge that I have received, read and agreed to these terms checkbox.
5. Click the Continue button.
6. Enter your smartphone number in the Mobile Phone Number field.
7. Click the Continue button.
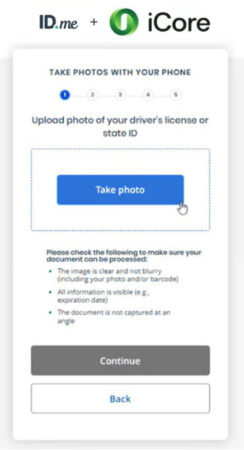
8. Upload photos of your document(s)
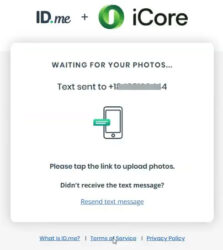
- You will see the following image on your computer, It will remain there while you upload your photos
- Click the link, in your text message, and follow prompts to take an image of the Front and Back of your Driver’s License
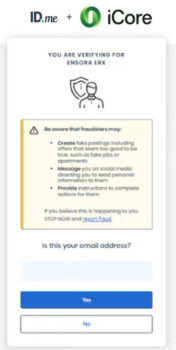
- Verify your email address
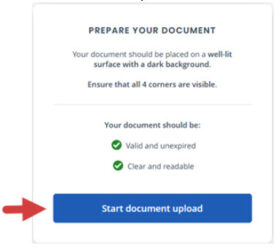
- Click the Start Document Upload button.
- Click the Take Photo button to upload photos of your document.
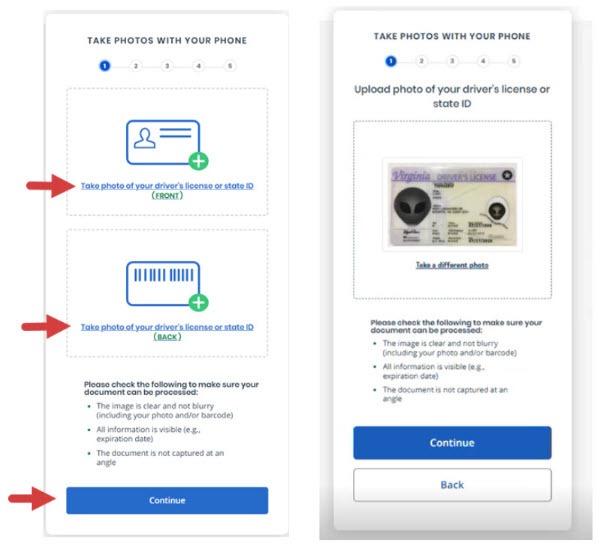
- Click FRONT, opens your camera to take the photo.
- Click BACK, opens your camera to take the photo. IMPORTANT: Make sure camera is clean, image is in focus, shows all 4 corners, and has no glare
- Click the Continue button.
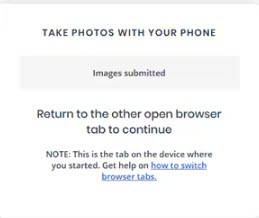
- When you see the Images Submitted confirmation, navigate back to the browser tab where you started the process.
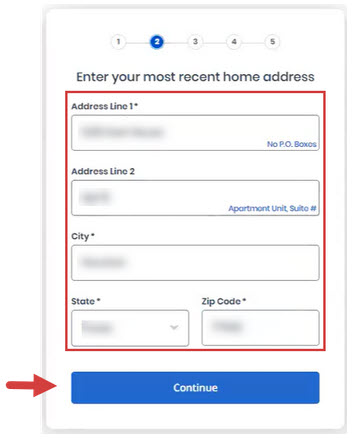
9. If prompted, Enter your most recent Home Address.
10. Click the Continue button.
Verify your personal information
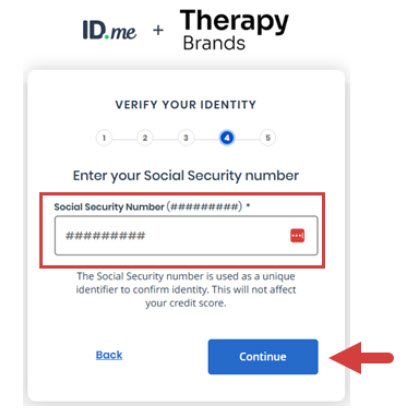
11. Enter your Social Security Number in the Social Security Number field.
12.Click the Continue button.
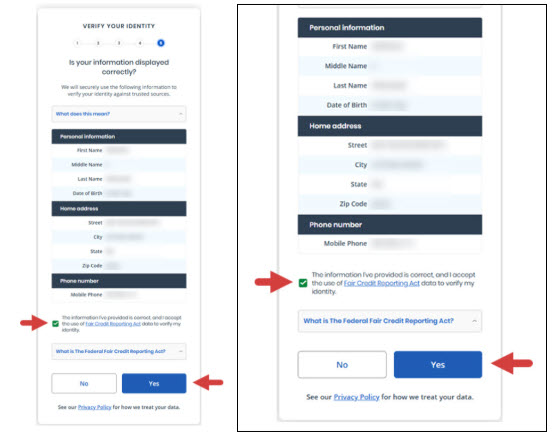
13. Review your Personal Information, Home Information and Phone Number to confirm they are all correct.
- If information is incorrect, Click NO, and proceed to correct your personal information. There may be additional prompts before proceeding
- If information is correct, proceed to the following steps
14. Click the checkbox to indicate that The information is correct and Accept use of the Credit Reporting Act data to verify identity
15. Click the Yes button.
Video Selfie and Liveness Detection
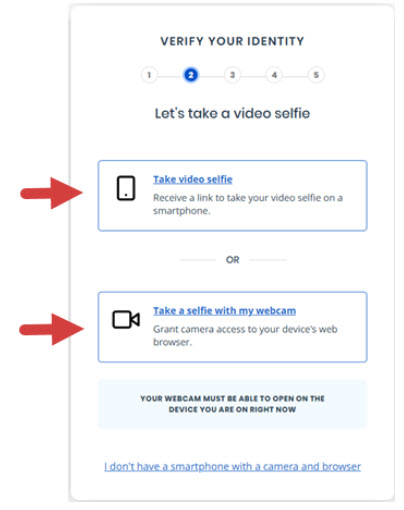
16. Take a Video Selfie
- Video images will be taken of your face and matched to your Driver’s License or State ID.
- Click Take a video selfie, to have a text message sent to your smartphone. Open the text message, click the link and follow the prompts
- Click Take a selfie with my webcam, to use your computer’s webcam, then follow the prompts
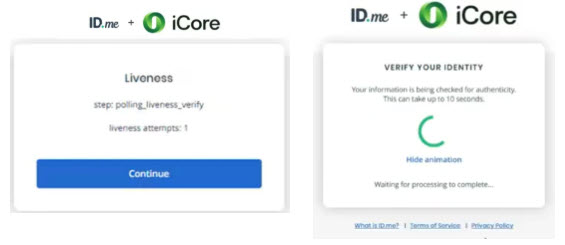
17. Once the Video Selfie has been completed, Liveness will be verified.
- Click Continue.
Add your Medical Information
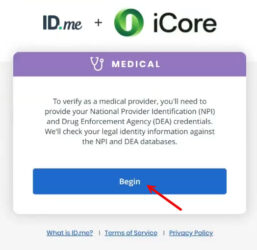
18. Click the Begin button, to add your Medical information
19. eRx Only Provider, will be asked the following.
- Click the Provider Type drop-down and select a Provider Type.
- Enter your NPI Number in the NPI Number field.
20. eRx + EPCS Provider, will be asked the following
- Enter your NPI Number in the NPI Number field.
- Enter your State and DEA Number in the State and DEA Number fields
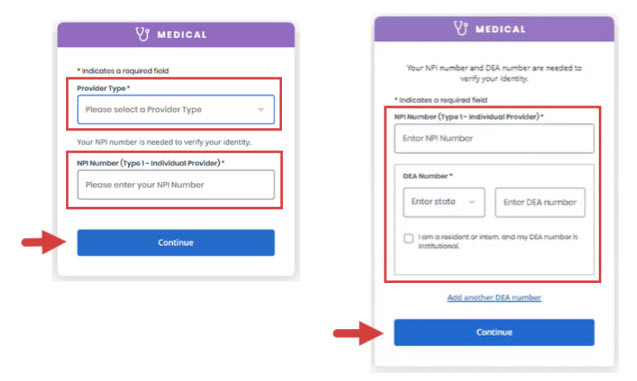
21. Click the Continue button
22. Review the information pertaining to your role.
23. Click the Continue button
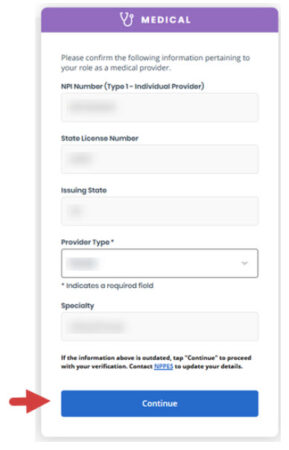
24. Click the Continue button
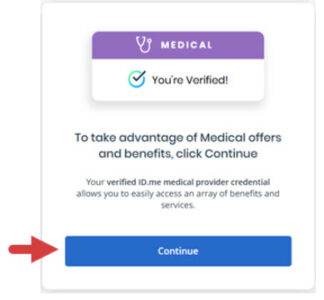
Link and Allow iCore
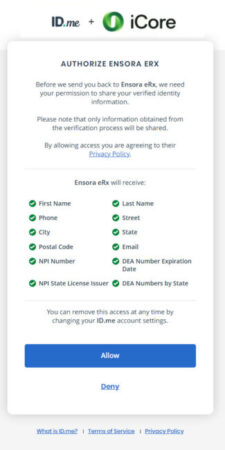
25. Click the Allow button.
Once you have completed identity proofing with ID.me, you will see this image…
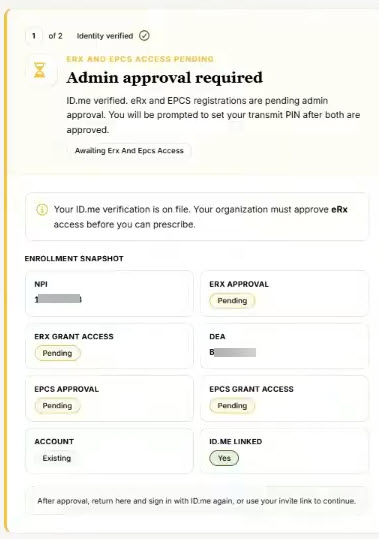
Admin Approval Required by iCore Representative
Email iCore for Admin Approval
Please email the below information to implementaion@icoreconnect.com.
- Practice Name (where you started your EPCS registration)
- Provider First Name
- Provider Last Name
- Provider NPI#
- Date of EPCS Registration with ID.me
Only after the Grant and Authorize process has been completed by an iCore Implementation Specialist, can you proceed to the below steps. You will be notified via email, once completed, with steps the below steps to finalize your registration:
- eRx Only Provider, After being notified by iCore
- Start Prescribing non-controlled prescriptions
- Click the Academy icon, from the left-menu, for the Rx Training video.
- eRx + EPCS Provider, After being notified by iCore
- MUST complete the next step: Finalize EPCS Registration
Finalize EPCS Registration
1. Once you receive the email from iCore Implementation Specialist, you will need to follow the below steps to finalize your EPCS Registration.
- You will NOT be able to transmit controlled substance prescriptions until the following steps have been completed:
Set Transmit PIN
2. Search and Select your patient from the schedule or patient database
- Click the Prescribe or green pill button to open patient record.
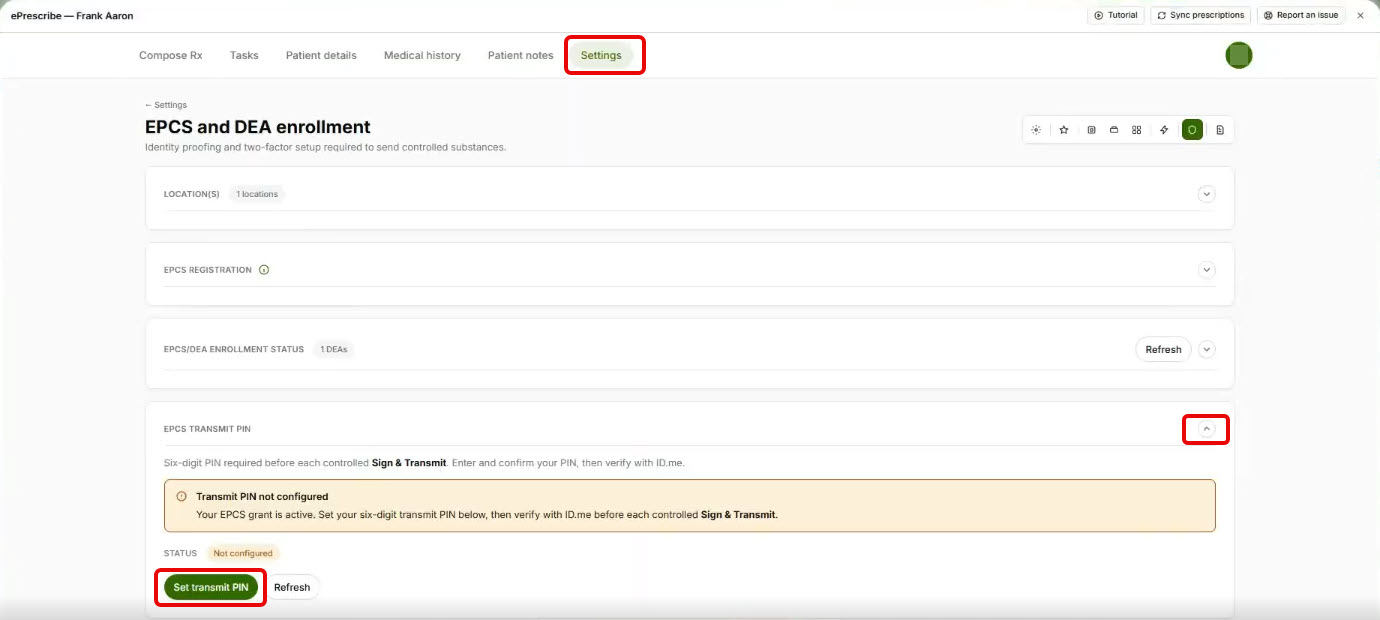
3. Go to the Settings tab.
4. Open the EPCS and DEA enrollment module.
5. Open the EPCS Transmit PIN module.
6. Click the green Set Transmit PIN button, on the bottom-left corner.
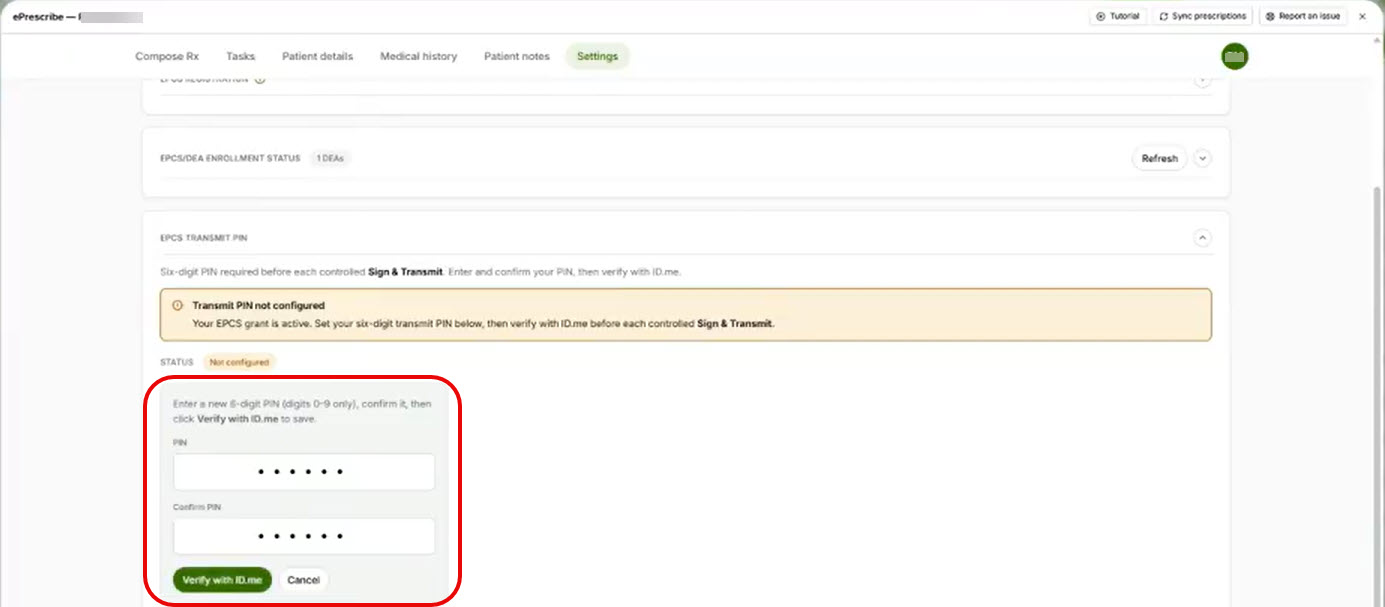
7. Create personal Transmit PIN.
- Enter a new 6-digit PIN (digits 0-9 only).
- Confirm 6-digit PIN
- Click the green Verify with ID.me button
Next Step: Start Prescribing!
How to write and transmit prescriptions in iCoreOS
1. Click the Academy  icon, from the left-menu, for the Rx Training video.
Important Contact information
- By Phone: 888-810-7706, option 2
- By Email: support@icoreconnect.com
- From your iCoreOS: Click the headset
 icon, in the top-right corner, to open a support ticket