This article provides step-by-step instructions on how to download and set up the Twilio Authy App to your cellphone.
THIS IS ONLY NECESSARY FOR DOCTORS WRITING CONTROLLED SUBSTANCES.
- What is the Twilio Authy App
- How to Download and Setup the Twilio Authy App
- How to Re-sync the Twilio Authy App
- How to Download and Setup the Twilio Authy App using a New Phone Number
What is the Twilio Authy App
The Twilio Authy App is used solely for the purpose of electronic prescribing controlled substances.
It is set up to the Provider’s cellphone and delivers a One Time Passcode which allows them to digitally sign for and release a controlled substance prescription.
How to Download and Set Up the Twilio Authy App
1. Search for Twilio Authy on your mobile phone’s app store (App Store for iPhones and Google Play on Android) and download the app.
2. Open the app, click Code and select the United States.
3. Enter your cellphone number and select OK.
4. Enter your email address and select OK.
5. Select SMS to get account verification via text message.
You will be able to verify the registration code via two different ways:
- Manually entering your registration code from your text messages.
- Clicking the link in your text messages to finish registering.
6. Allow notifications to your cellphone.
Once the registration code has been entered, you’ll be brought to a screen to add an account.
You WILL NOT need to enter your account information.
During your EPCS Registration appointment, we will authenticate Authy on your cellphone together to generate tokens for controlled substance prescriptions.
| Quick Tip: |
|---|
| The app must be downloaded on a cellphone, not an iPad, tablet or computer. |
How to Re-Sync the Twilio Authy App to your iCoreRx Site
Reminder: Authy must be installed on a cellphone, not a tablet or computer.
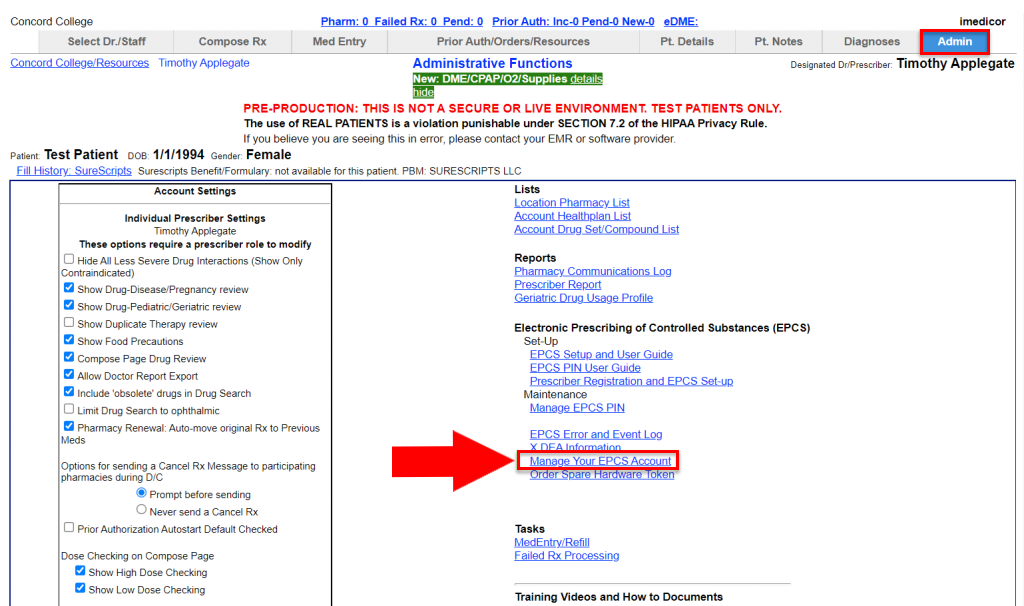
1. Select the Admin tab in the far right corner.
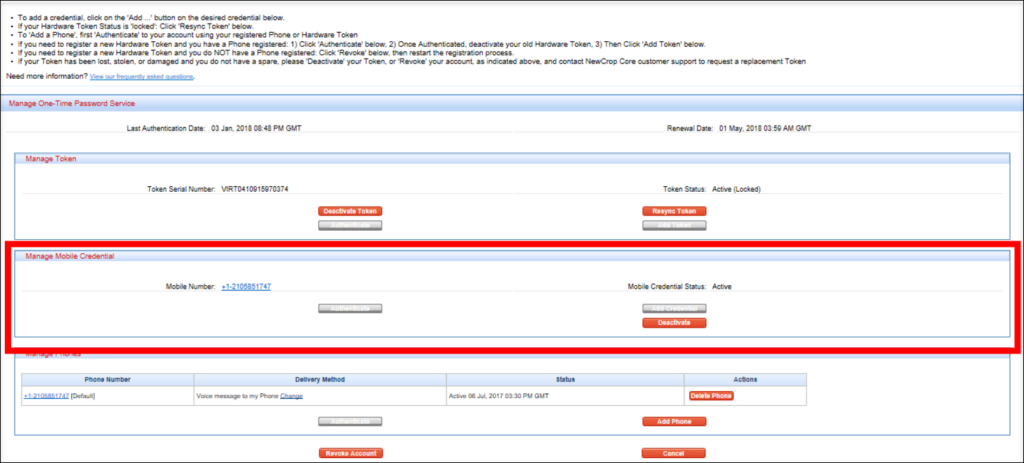
2. Select the 13th link in the middle of the screen, Manage your EPCS Account
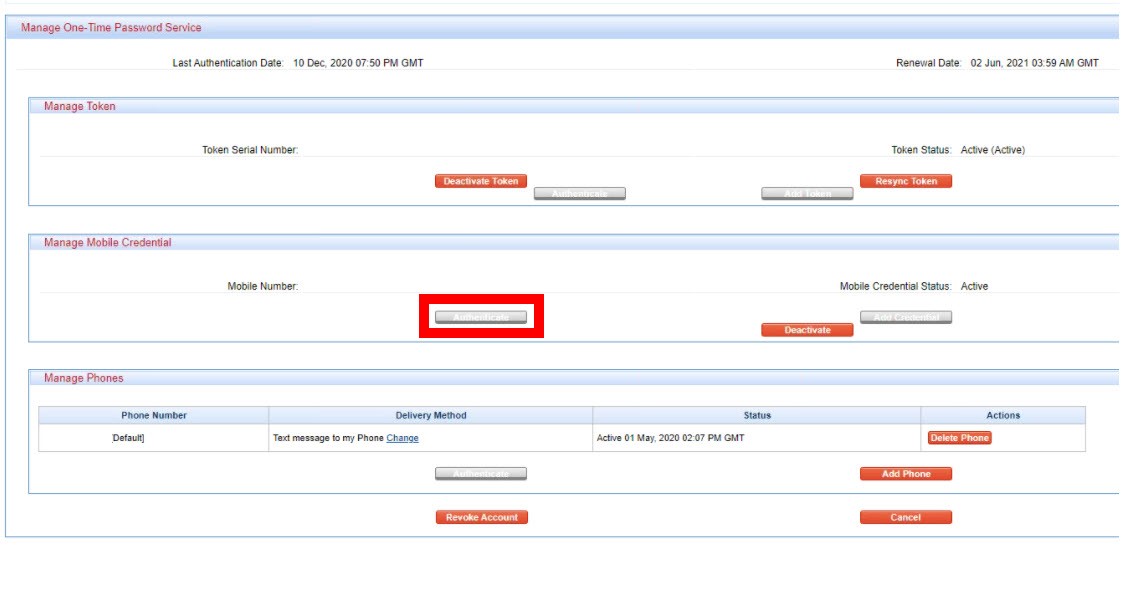
3. In the Manage Mobile Credential box, select the Authenticate button
4. Open the Authy App on your cellphone. The icon will look like this:
5. Once the phone displays the screen “Your NewCrop Token Is: xxxxxx” you will be ready to bind the app to your Exostar account.
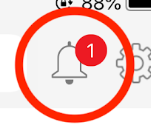
6. Select the Bell Icon at the top of your cellphone screen.
7. Select the message “Approve me to Authenticate” then select “Approve”
8. Your Exostar Account indicates that Mobile Credential Status is Active. Click Cancel to return to the admin screen.
The Twilio Authy app has been successfully re-synced to your EPCS account. You can utilize the Test Pharmacy to send a controlled substance to verify the Twilio Authy app is synced if needed.
How to Download and Setup the Twilio Authy App using a New Phone Number
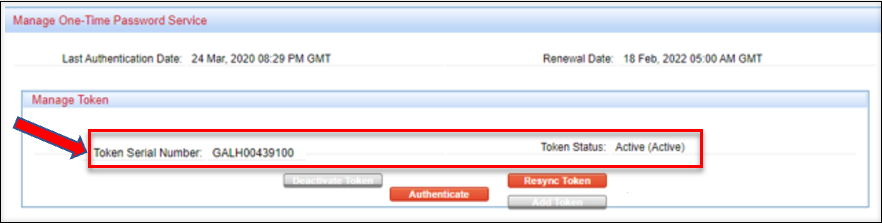
You will want to ensure your Hardware Token device has been authenticated to your account. If this step has not been completed, you will need to complete this step first and then once completed return and follow the steps below to setup Twilio Authy on your existing account. You can verify if this is completed under the Manage Token section.
1. Select the Admin tab from the top menu bar
2. Click the Manage Your EPCS Account.
3. In the Manage Mobile Credential section, select the Deactivate button.

4. Confirm reason for deactivation.
Be careful, do not select revoke my account as this action will be irreversible.
5. In the same section Manage Mobile Credential section, select the Add Credential button.

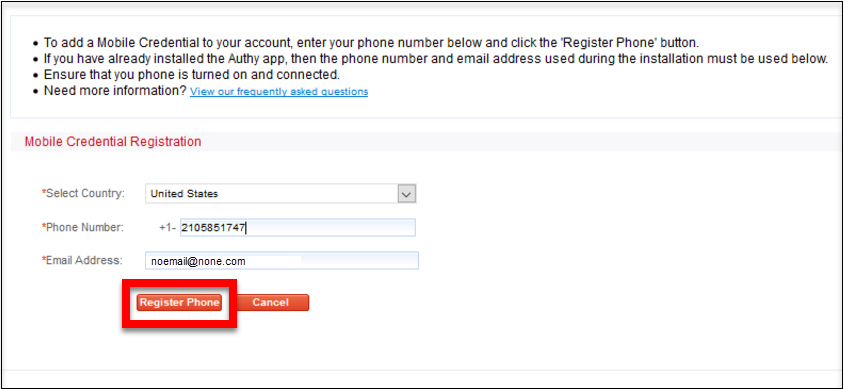
6. Enter your cellphone number and click the Register Phone button.
7. Click on the download link sent via text message or Search for Twilio Authy on your mobile phone’s app store (App Store for iPhones and Google Play on Android) and download the app.
8. Open the app, click Code and select the United States.
9. Enter your cellphone number and select OK.
10. Enter your email address and select OK.
11. Select SMS to get account verification via text message.
You will be able to verify the registration code two different ways:
- Manually entering your registration code from your text messages.
- Clicking the link in your text messages to finish registering.
12. Allow notifications to your cellphone.
13. Once the phone displays the screen “Your NewCrop Token Is: xxxxxx” you will be ready to bind the app to your Exostar account.
14. Select the Bell Icon at the top of your cellphone screen.
15. Select the message “Approve me to Authenticate” then select “Approve”
16. Your Exostar Account indicates that Mobile Credential Status is Active.
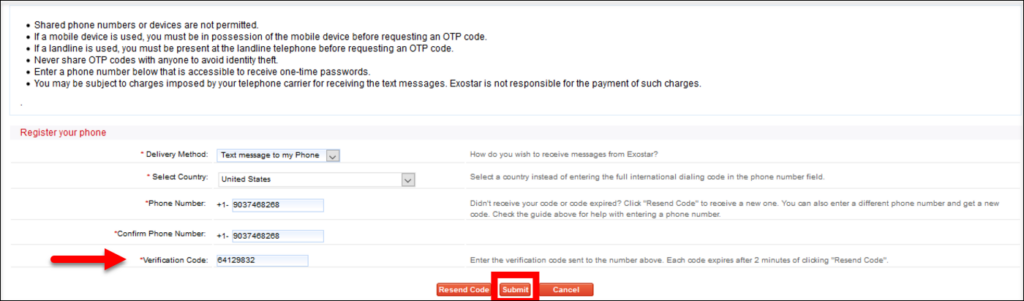
17. Under the Manage Phones section click the Add Phone button.

18. Enter your Phone Number click the Send Code button. A code will be texted to your mobile phone.

19. Enter the Verification Code sent to your phone and click the Submit button. This will take you back to the previous screen.
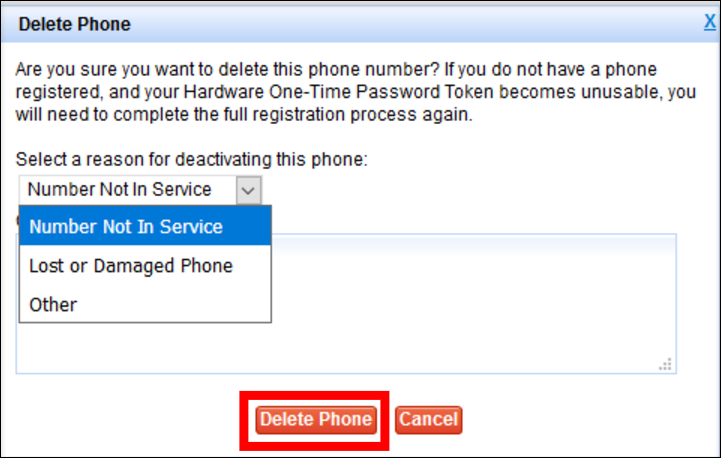
20. Under the Manage Phones section, mark your new cellphone number as DEFAULT.

21. Delete any unused phone numbers by clicking the Delete Phone button. You may be asked to confirm this change.

22. Use the drop down to indicate the reason you wish to delete the phone number and click the Delete Phone button.