This article provides step-by-step instructions on how to download and set up the Twilio Authy App to your cellphone.
THIS IS ONLY NECESSARY FOR DOCTORS WRITING CONTROLLED SUBSTANCES.
- What is the Twilio Authy App
- How to Download and Setup the Twilio Authy App
- How to Re-sync the Twilio Authy App
- How to Download and Setup the Twilio Authy App using a New Phone Number
- Troubleshooting Authy Binding When Using the Email Verification Code
What is the Twilio Authy App
The Twilio Authy App is one of your One-Time Password (OTP) device options and is used solely for the purpose of electronically prescribing controlled substances.
It is set up on the Provider’s cellphone and delivers a six digit One-Time passcode which allows them to electronically sign and release a controlled substance prescription.
The Twilio Authy App is free and available for download from the App Store for iPhones and Google Play for Android.

How to Download and Setup the Twilio Authy App
We recommend the Provider download and setup the Twilio Authy app on their cellphone prior to their EPCS Registration appointment.
Please see the video below for a walk through of the following steps on how to download and begin setup of the Authy app.
Reminder: Authy must be installed on a cellphone, not a tablet or computer.
1. Search for Twilio Authy in the app store (App Store for iPhone and Google Play on Android).
2. Download and Open the Twilio Authy app.
3. Click box for Code or Country Code and select the United States.
4. Enter your cellphone number and select OK.
5. Enter your email address and select OK.
- Depending on phone settings, you may need to verify your email address.
- A code will be sent to your email address.
- Enter the code into the app to verify your email address.
6. Select SMS to get account verification via text message.
You will have the option to verify your code three different ways:
- Manually enter the code from your text message.
- Click the link provided in your text message.
- Manually entering code received via email.
7. Select Yes to allow notifications to your cellphone.
8. You will be brought to a screen to add an account. Please stop at this point.
- You WILL NOT need to enter your account information.
- This will be completed during your EPCS Registration appointment.
| IMPORTANT: |
|---|
| The Twilio Authy app must be downloaded on a cellphone, not an iPad, tablet or computer. |
How to Re-sync the Twilio Authy App
The steps below will walk you through how to Re-Sync your Twilio Authy app if your app looses connection with your account.
Reminder: Authy must be installed on a cellphone, not a tablet or computer.
1. Select the Admin tab from the top menu bar
2. Click the EPCS Device Management link from the EPCS User Controls section of the Admin tab
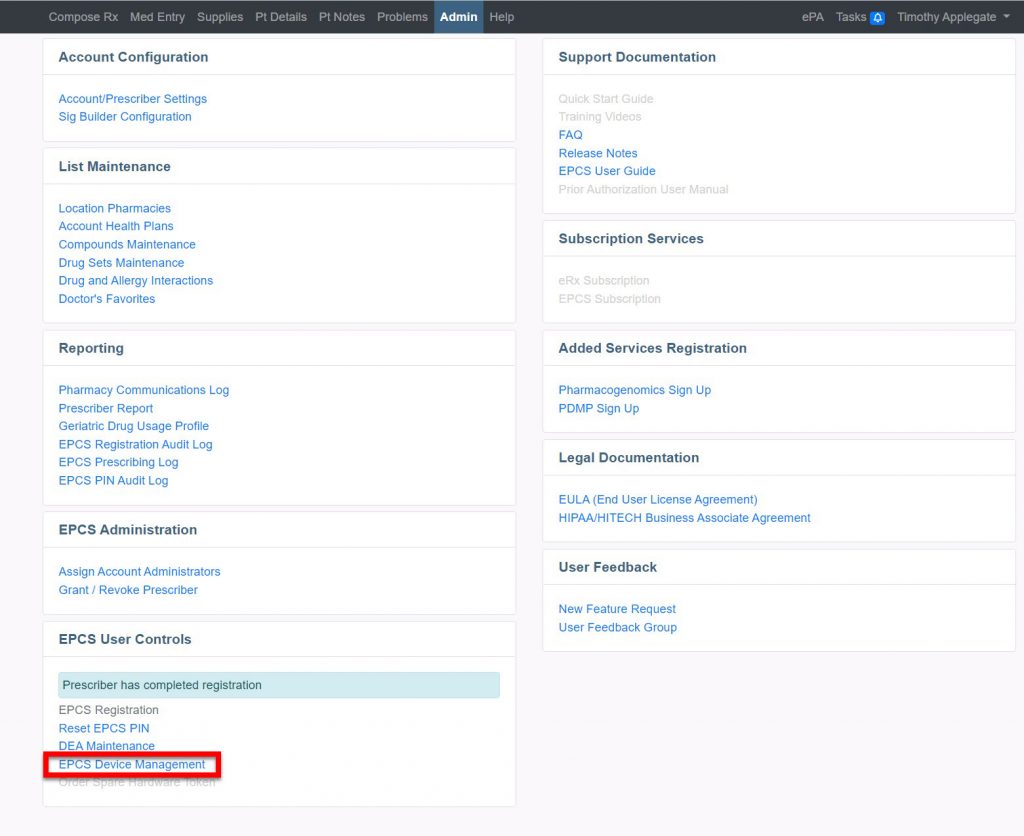
3. In the Manage Mobile Credential box, select the Authenticate button.

4. Open the Authy App on your cellphone. The icon will look like this:
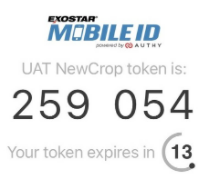
5. Once the phone displays the screen “Your NewCrop Token Is: xxxxxx” you will be ready to bind the app to your Exostar account.
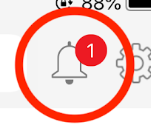
6. Select the Bell Icon at the top of your cellphone screen.
7. Select the message “Approve me to Authenticate” then select “Approve”
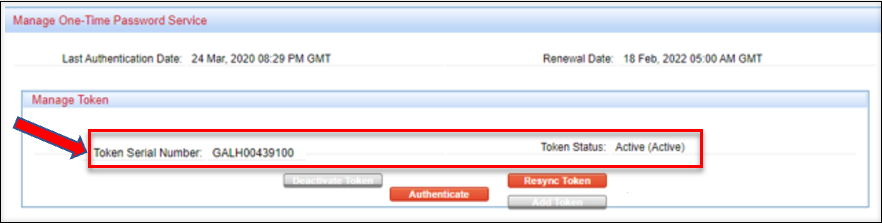
8. Your Exostar Account indicates that Mobile Credential Status is Active. Click Cancel to return to the admin screen.
The Twilio Authy app has been successfully re-synced to your EPCS account. You can utilize the Test Pharmacy to send a controlled substance to verify the Twilio Authy app is synced if needed.
How to Download and Setup the Twilio Authy App using a New Phone Number
The steps below will walk you through how to re-install and connect your Twilio Authy app in the event you get a new cellphone or new cellphone number.
1. You MUST have your Hardware Token device active in order to authenticate to your account.
- If your Hardware Token is not active, click HERE.
2. Select the Admin tab from the top menu bar
3. Click the EPCS Device Management link from the EPCS User Controls section of the Admin tab
4. In the Manage Mobile Credential section, select the Deactivate button.

5. Confirm reason for deactivation.
Be careful, do not select revoke my account as this action will be irreversible.
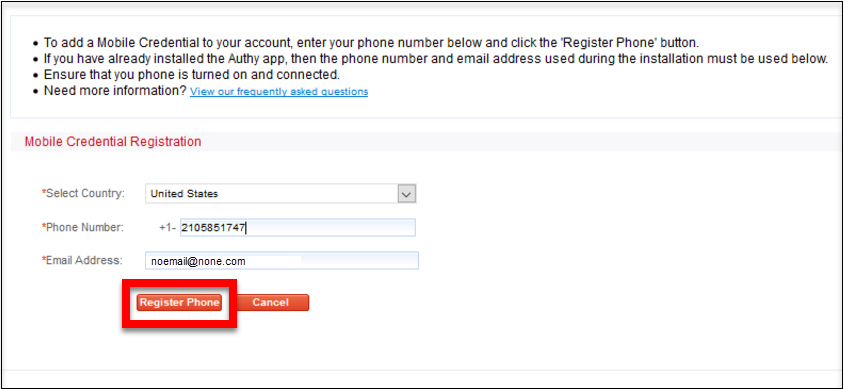
6. In the same section Manage Mobile Credential section, select the Add Credential button.

7. Enter your cellphone number and click the Register Phone button.
8. Click on the download link sent via text message or Search for Twilio Authy on your mobile phone’s app store (App Store for iPhones and Google Play on Android) and download the app.
9. Open the app, click Code and select the United States.
10. Enter your cellphone number and select OK.
11. Enter your email address and select OK.
12. Select SMS to get account verification via text message.
You will be able to verify the registration code three different ways:
- Manually entering your registration code from your text messages.
- Clicking the link in your text messages to finish registering.
- Manually entering the registration code received via email.
13. Allow notifications to your cellphone.
14. Once the phone displays the screen “Your NewCrop Token Is: xxxxxx” you will be ready to bind the app to your Exostar account.
15. Select the Bell Icon at the top of your cellphone screen.
16. Select the message “Approve me to Authenticate” then select “Approve”
17. Your Exostar Account indicates that Mobile Credential Status is Active.
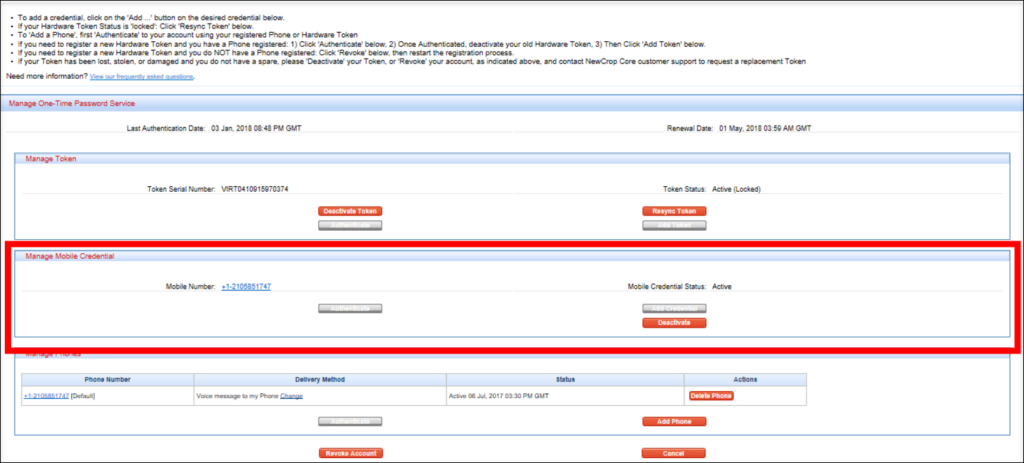
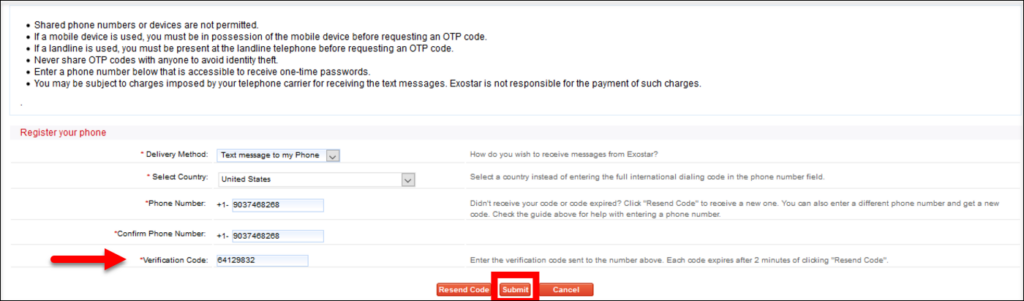
18. Under the Manage Phones section click the Add Phone button.

19. Enter your Phone Number click the Send Code button. A code will be texted to your mobile phone.

20. Enter the Verification Code sent to your phone and click the Submit button. This will take you back to the previous screen.
21. Under the Manage Phones section, mark your new cellphone number as DEFAULT.

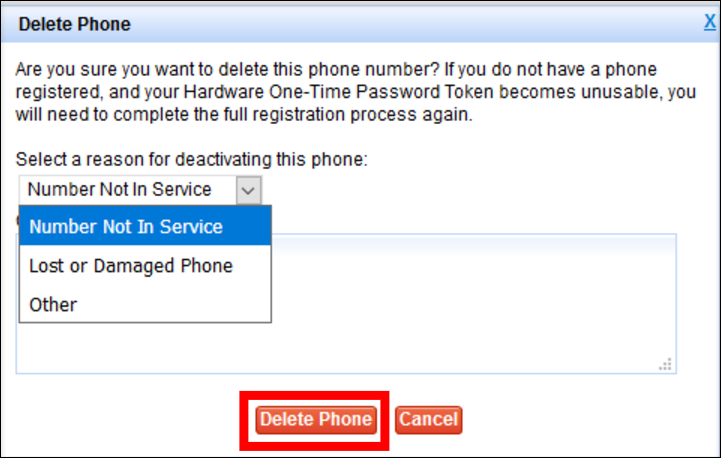
22. Delete any unused phone numbers by clicking the Delete Phone button. You may be asked to confirm this change.

23. Use the drop down to indicate the reason you wish to delete the phone number and click the Delete Phone button.
Troubleshooting Authy Binding When Using the Email Verification Code
If you do not receive the emailed verification code from Twilio Authy to complete the binding step, you may follow the steps below to troubleshoot.
1. Check the Junk and Spam folder. This is a common occurrence with these types of emails
The email will be sent from noreply@authy.com and the subject line will read “Twilio Authy Verification Code”
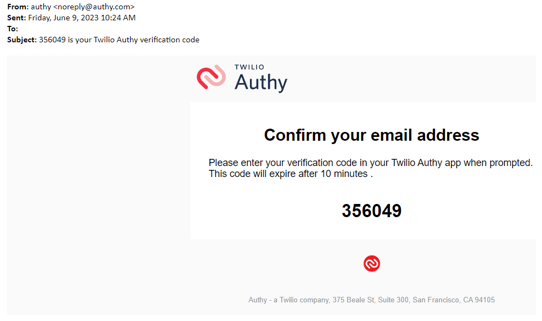
2. If you do not locate the email in your Junk or Spam folder, you may need to Unblock or Whitelist the email from Authy. Whitelist the following email: noreply@authy.com. Once whitelisted try again.
3. Contact Authy Support to Update or Change your Authy Email Address or do so from within your Authy account.