This is be completed by the Provider in order to transmit Controlled Substance prescriptions.
| EXTREMELY IMPORTANT: |
|---|
| Please be aware that the EPCS Registration process is complex and, if not executed correctly, could lead to delays or a block from SureScripts. Resolution may take considerable time. To prevent such issues, you might consider scheduling a guided walkthrough to guarantee a successful outcome.
Click Here to schedule an appointment.
|
For instruction on how to login to your iCoreRx site please refer to the articles below:
For instruction on how to select a patient please refer to the articles below:
Start Provider EPCS Registration:
- Part 1: Verify Prescriber information
- Part 2: Federal Identity Proofing Process
- Part 3: Confirm and Finalize Provider Registration
Part 1: Verify Prescriber information
1. From the Admin tab, click the EPCS Registration link in the EPCS User Controls section.
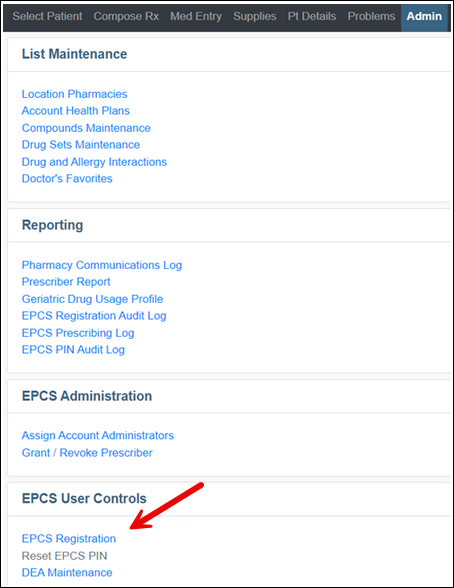
2. Enter your information as follows:
- Full Name exactly how it appears on your drivers license.
- Home Address (do not use an office address)
- Email Address in both boxes, then click Continue
| Quick Tips: |
|---|
| 1. To avoid registration errors, two word names without hyphens should be entered without a space in between. For example, the first name “John Paul” should be entered as “JohnPaul”.
2. The prescriber’s DEA Number auto populates from your e-prescribing site setup. If this is incorrect, you MUST contact iCoreRx Support Team @ 888-810-7706 to make the correction. |
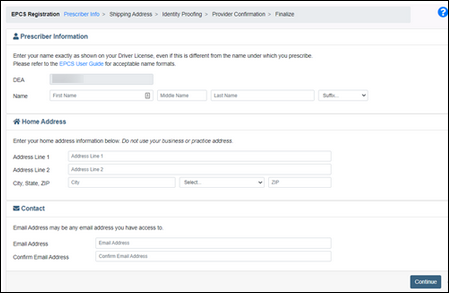
3. Choose the Shipping Destination for the hardware token. This can be the provider’s Practice Address or Home Address.
4. Click the Order Token button.
| Quick Tip: |
|---|
| Providers who already have an existing Exostar account will see a Possible Duplicate Registration alert, you MUST contact iCoreRx Implementation Team @ 888-810-7706 or by emailing implementation@icoreconnect.com to copy your EPCS credentials to an additional account and or location. |
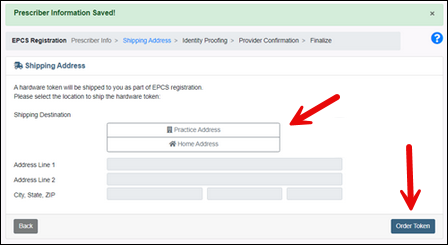
5. A message confirms the order was successful.
| Quick Tip: |
|---|
| It typically takes 3 – 5 business days to receive the hardware token. You do not need to wait to receive the hardware token to continue the EPCS registration process. You can add the hardware token to your account later. |
Part 2: Federal Identity Proofing Process
1. Click the Begin button, to start the Federal Identity Proofing Process
![]()
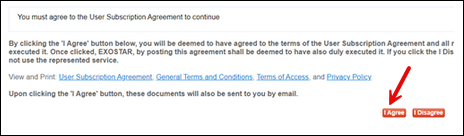
2. Click the I Agree button at the bottom of the Exostar Agreement page.
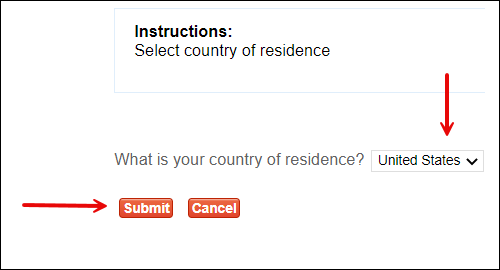
3. Select your Country of Residence (United States is the only option).
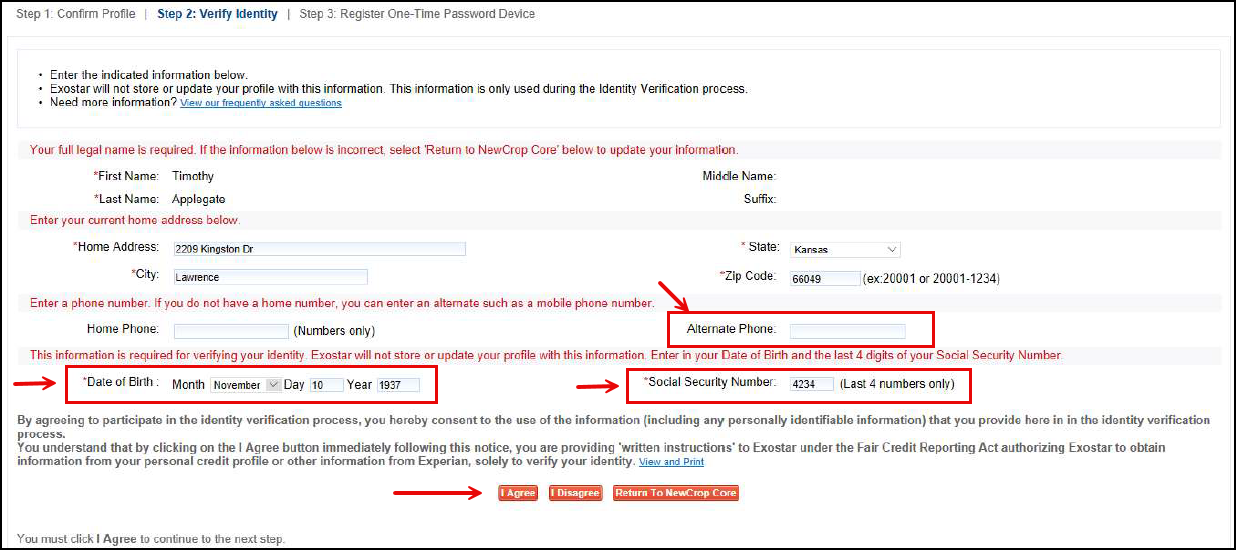
4. Enter an Alternate Phone (personal cell phone number) to help with identity verification.
5. Enter Date of Birth and Social Security Number (last four digits).
6. Click the I Agree button.
Click here to be directed to the Webcam Proofing Guide. Quick Tip: If at any point in the next few steps, you get a notification that your identity proofing was canceled; you will be directed to complete Webcam Proofing in order to verify your identity.
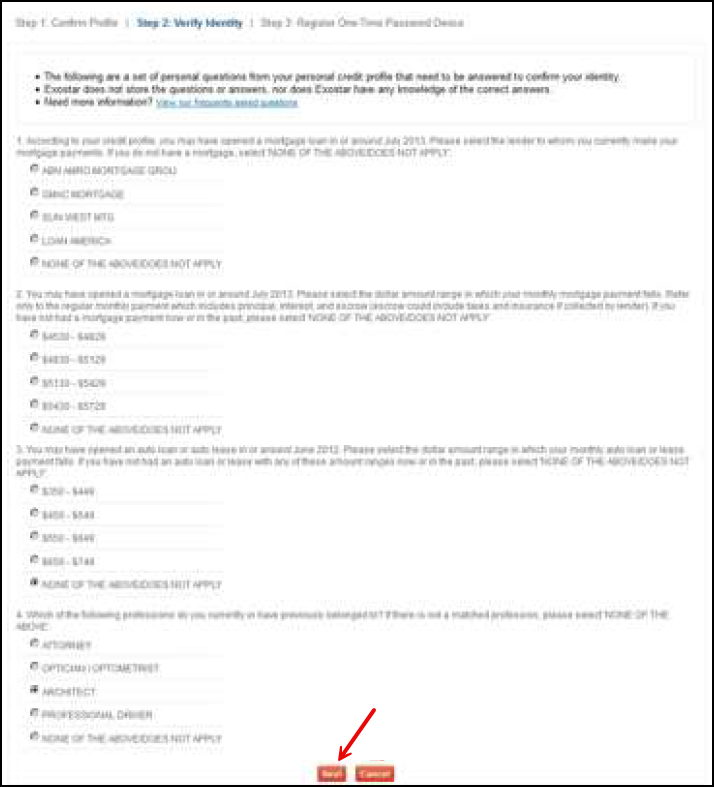
7. Answer all questions in the Identity Verification Questionnaire.
- Questions are based on your personal credit profile.
8. Click the Next button, one time only.
9. If you have received the hardware token that was ordered during the first part of the registration process, enter the Hardware Token Serial Number and One-Time Passwords to register your hardware token. If you have not yet received your hardware token, leave these fields blank. You can add the hardware token to your account later.
- Click the button on the hardware token to get the first Password, which will be a six-digit code. Once the screen on the hardware token goes blank, click again for the second Password.
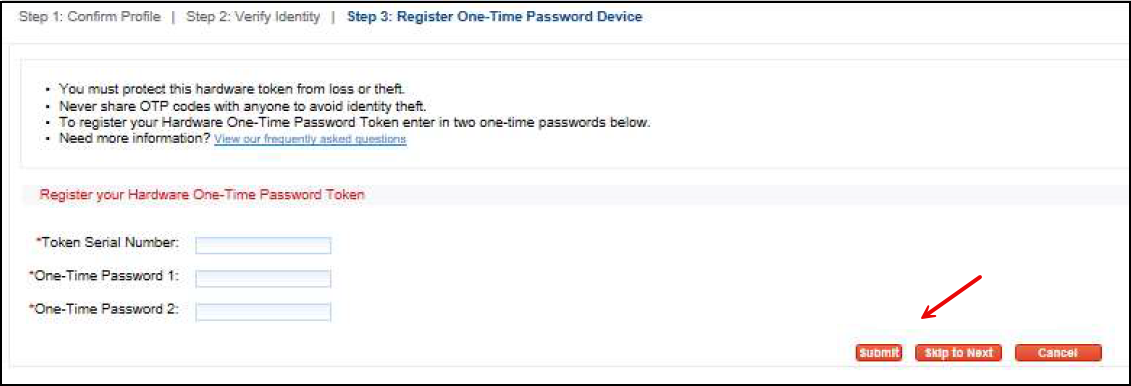
10. Click Submit to register your hardware token, or click Skip to Next if you have not yet received the hardware token.
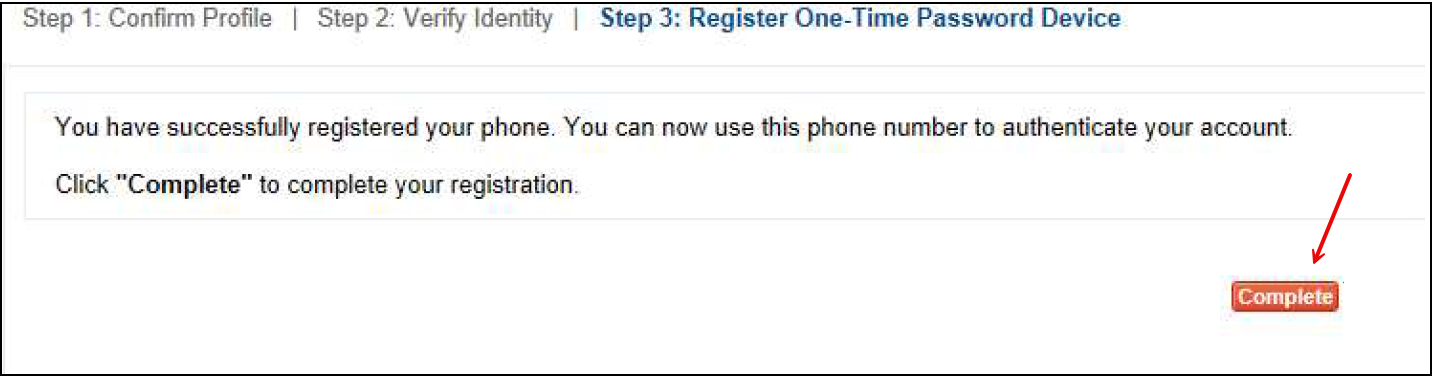
- After you click Submit, a message opens to confirm the hardware token successfully registered. Click Complete to proceed with mobile credential registration.
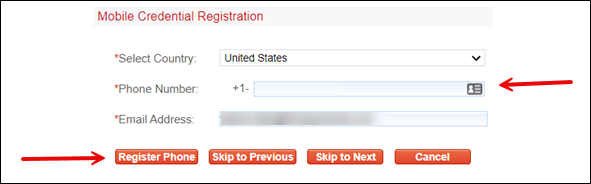
11. Enter your cell or mobile Phone Number.
12. Click Register Phone.
13. Click on the download link sent via text message or Search for Twilio Authy on your mobile phone’s app store (App Store for iPhones and Google Play on Android) and download the app.
14. Open the app, click Code and select the United States.
15. Enter your cellphone number and select OK.
16. Enter your email address and select OK.
17. Select SMS to get account verification via text message.
You will be able to verify the registration code three different ways:
- Manually entering your registration code from your text messages.
- Clicking the link in your text messages to finish registering.
- Manually entering the registration code received via email.
18. Click Yes, to allow notifications to your cellphone.
- Click Skip, if asked to backup and sync.
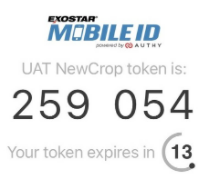
19. Once the phone displays the screen “Your NewCrop Token Is: xxxxxx” you will be ready to bind the app to your Exostar account.
20. Select the Bell Icon at the top of your cellphone screen.

21. Select the message “Approve me to Authenticate” then select “Approve”
22. On your Computer, click Complete to confirm mobile credential registration.
23. Enter your cellphone number two times to register it with Exostar.
24. Click Send Code.
- You will receive a test message with an 8-digit verification code.
25. On your Computer, enter the Verification Code you received on the phone you just registered.
26. A message opens to confirm the phone was been successfully registered. Click Complete to proceed.
27. The next step, Grant and Authorize, is to be performed by an iCoreConnect representative. You will need to click the link to submit your information.
Practice Name (where you started your EPCS registration)
Provider Full Name
Provider NPI#
- An iCore representative will Grant and Authorize my EPCS Registration form. You should receive a response back with in a couple of hours with instructions on how to finalize your registration.