This article will walk you through step-by-step and explain how to:
- Compose a Prescription
- Transmit a Prescription
- How to write a Custom Prescription using the Additional Sig
- Mail Order Scripts
To view the Quick Steps to Send a Prescription article as a PDF please click HERE.
| Quick Jump to Additional Articles: |
|---|
|
For instruction on how to login to your iCoreRx site please refer to the articles below: For instruction on how to select a patient please refer to the articles below: |
Compose a Prescription
Once logged in and a patient is selected there are three steps to composing a prescription:
1. Add Medication
There are three ways to select the desired medication.
- Search for Drug Name
- Select Medication from Doctor’s List (Favorites List)
- Select Medication from Drug Sets/Compound List
Search for Drug Name
1. Type in the drug name in the Drug Search field.
For best search results, search by the GENERIC name of the drug.
| Quick Tip: |
|---|
You can modify your search results or view additional drug information from the Search Results window:
|
2. Select from the drop-down or Click on the blue Drug Search button.
3. Select the Drug Name, in black, to expand the category and show the Drug Strengths and Forms that are available.
4. Select the Drug Strength and Form, in blue, you need to prescribe.
5. Fill out the Prescription Pad, from left to right.
See instructions on how to fill out the the Prescription Pad below.
Select Medication from the Quick Rx (formerly Favorites) button.
1. Select the Quick Rx button.
2. Check the box on one or multiple saved templates.
3. Click the Prescribe button, to proceed to the Transmit Page.
Staff users on the MedEntry tab, will click the Queue Rx button to save Rx in the Prescriber or Doctor’s Pending list.
View the full article for a detailed instruction on How to use the Quick Rx Button.
Select Medication from Drug Sets or Compounds Lists
1. Click on the grey Drug Sets or Compounds button.
2. Select the desired prescription.
- Drug Sets: Select the radio button to choose all drugs in the set or select the checkbox to choose each desired drug in the set and click the blue Prescribe button.
- Compounds: Select the radio button to choose the desired compound and click the blue Prescribe button.
View the full article for more detailed instruction on Managing Drug Sets/Compounds.
2. Complete Electronic Prescription Pad
Complete the Electronic Prescription Pad from left to right, starting with the Patient’s instructions.
1. Select Dosage Quantity.
Check PRN checkbox if prescribing a Controlled Substance and select a reason.
| Quick Tip: |
|---|
Other options available to you:
|
2. Select Frequency.
3. Enter Dispense Quantity.
- Use the Days Supply to auto-calculate the Dispense Quantity.
- or manually key in the Dispense Quantity.
4. Manually key in the number of Refills or select the number from the drop-down.
5. Use the Additional Sig field for any additional instructions to your Patient, keep it simple.
| Quick Tip: |
|---|
| You can use the Additional Sig to write a Custom Prescription.
Custom Prescriptions can consist of medications containing more than one set of instructions, i.e…PreMeds, or any circumstance where you prefer to handwrite instructions.
|
6. Use the Pharmacist Message field for any additional instructions to the Pharmacy.
7. Use the Office Notes field for any internal messages, if needed.
| Quick Tip: |
|---|
Enter Additional Information as needed.
|
8. Select the checkbox Add to Quick Rx, at the top of the page, to store this script to the Quick Rx list, formerly the Doctor’s (Favorites) List.
9. Click blue Prescribe button once pad is complete, to transmit the prescription to the pharmacy.
If you decide you are not ready to transmit the prescription to the pharmacy, you will be able to Save or Delete the prescription.
- Delete button: Click the Delete button to return to the Compose page and discard the prescription.
- Queue Rx button: Click the Queue Rx button to save and add the prescription to the Pending Rx list, under Tasks, instead of transmitting it to the pharmacy.
- Leaving without any selection will leave the script pending in its current state.
3. Add Patient Pharmacy
If the patient already has a pharmacy you may skip this step and continue to Transmit a Prescription.
| Important Note: |
|---|
| Controlled Substance participating pharmacies will be marked with a checkmark. |
1. After clicking Prescribe on the prescription pad you will have two options to select the patient’s pharmacy:
Option 1. From the Compose Rx tab select the pharmacy drop down box located on right corner of the page and then select Add Pharmacy. Enter the Pharmacy details and click the blue Search button. Next, click the blue Select button to select the pharmacy.
Option 2. From the Pt Details tab located at the top of the page. Click the blue Add button. Enter the Pharmacy details and click the blue Search button. Next, click the blue Select button to select the pharmacy.
| Quick Tip: |
|---|
| Search by the pharmacy’s name and zip code or phone number |
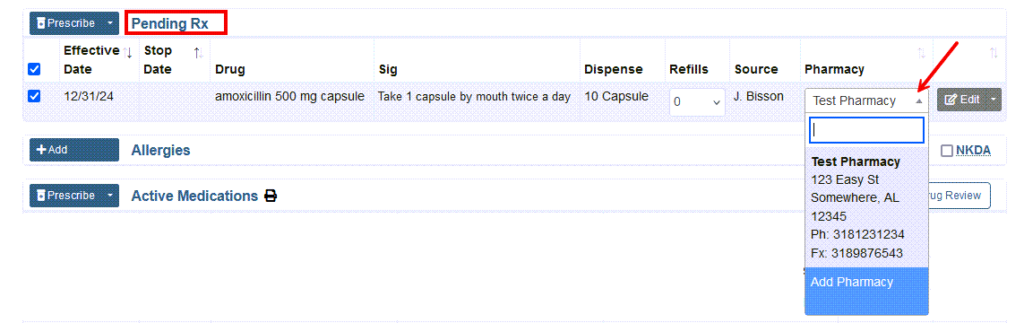
Option 3. Change the Pharmacy on a Prescription
- Before sending a prescription to the pharmacy, you can choose a different patient pharmacy from the Transmit Rx page or the Pending Rx list.
- The best use for this option, if the patient also requires a Mail Order Prescription. You can prescribe to a local pharmacy for immediate pickup, and at the same time, transmit the mail order prescription. Just choose the correct pharmacy location on each script listed.
- Click on the pharmacy name in the Pharmacy column, then choose a pharmacy from the drop-down list. You can also add a new pharmacy to the patients list by selecting Add Pharmacy.
From the Pending Rx list on the Compose Rx or Med Entry tab.
From the Transmit page.
![]()
Transmit a Prescription
The Transmit page explained:
1. Click the Prescribe button.
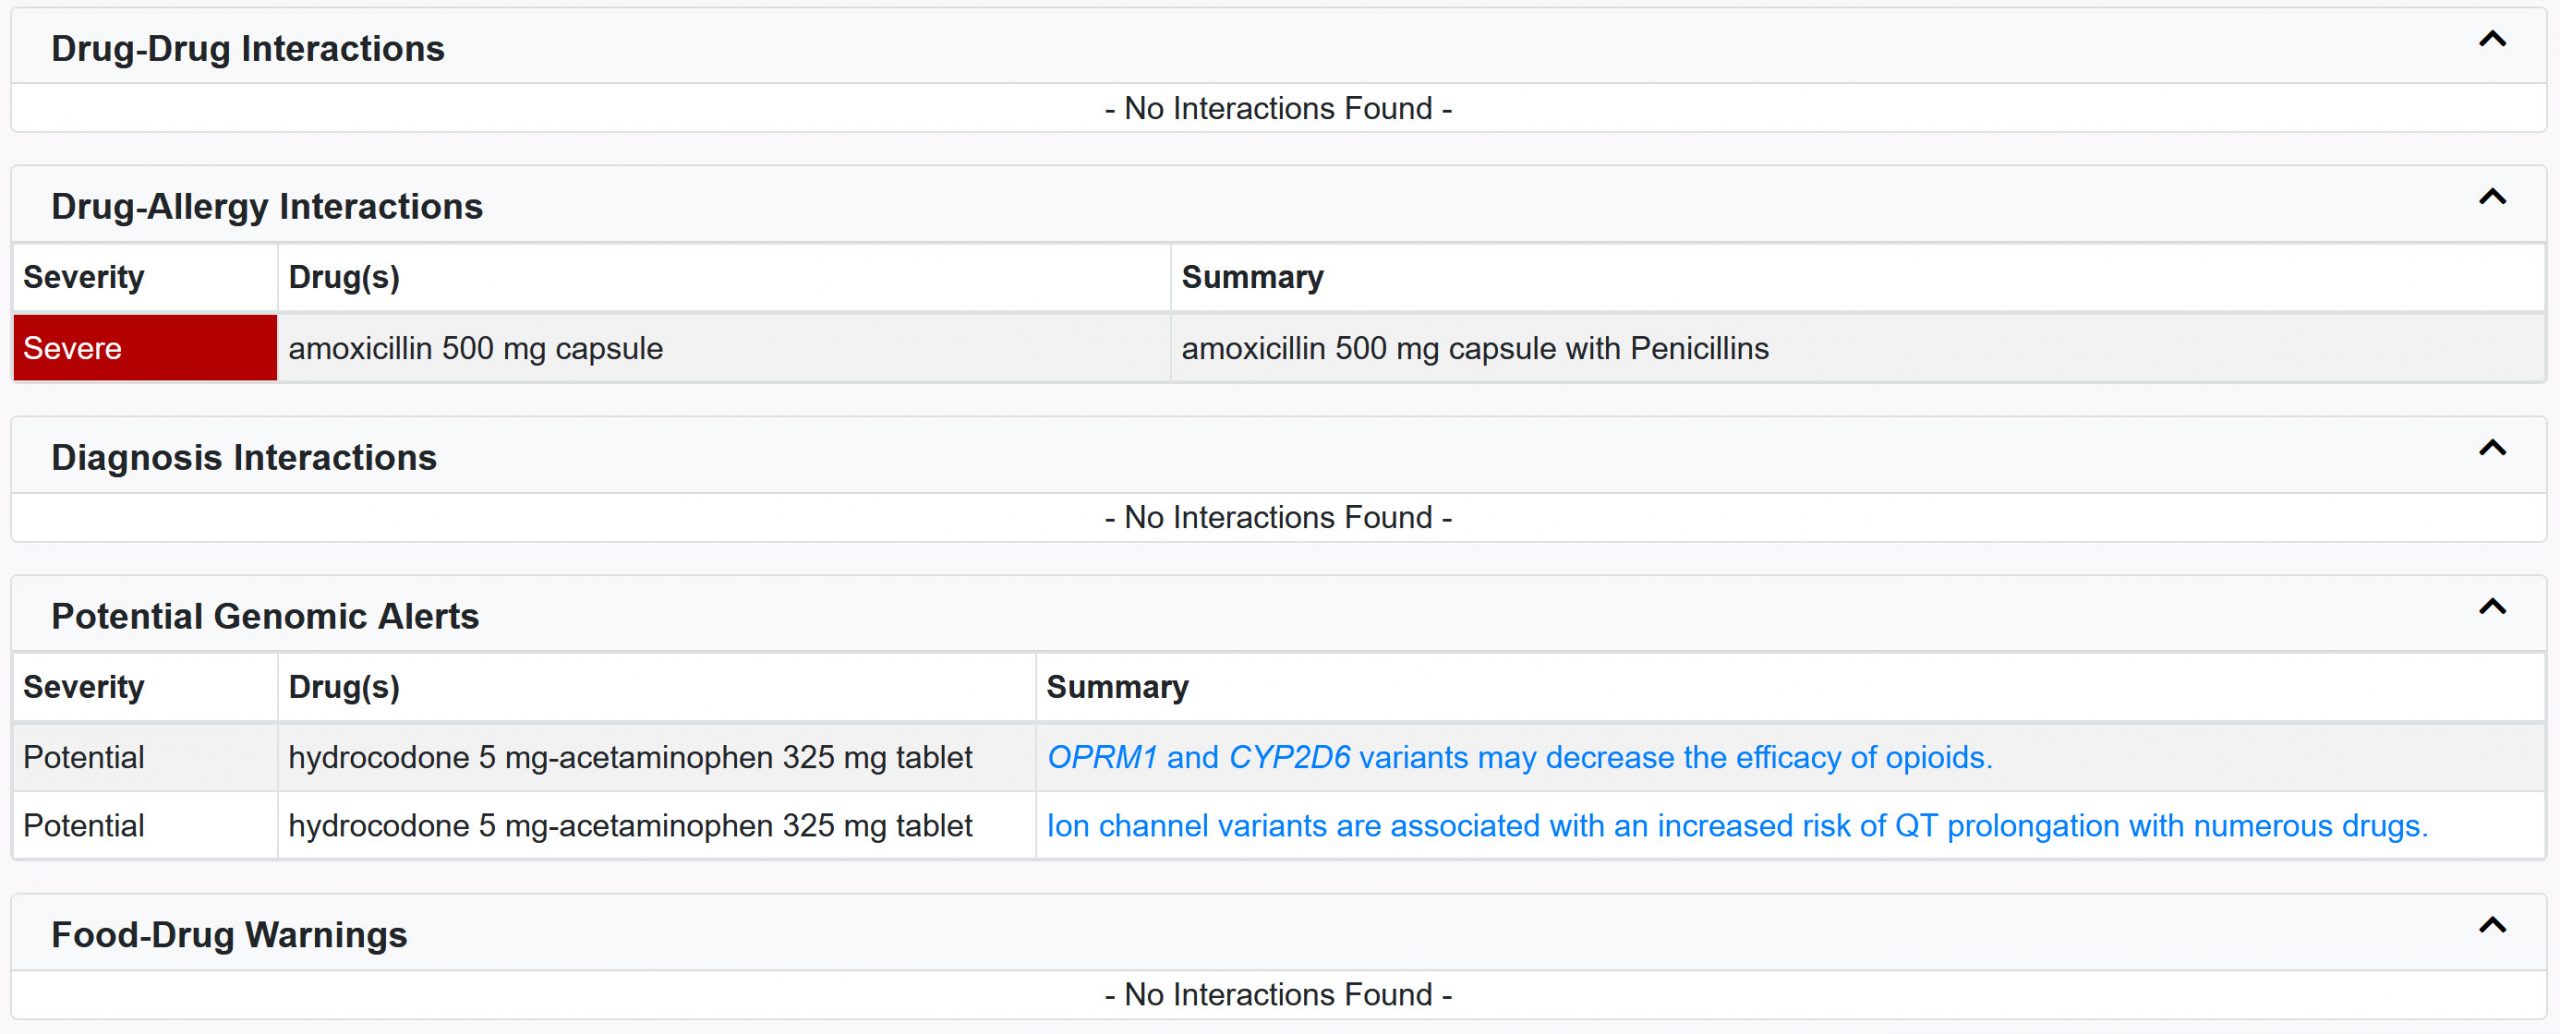
2. On the Transmit page, review any Drug Interactions and Alerts if applicable.
A long list of interactions may be minimized by clicking the expand/collapse toggle.
3. After Reviewing Drug Interactions follow the below steps to transmit each type of prescription(s):
a. Non-controlled substance prescription
b. Controlled substance prescription
a. Transmit a Non-Controlled Substance Prescription
1. Confirm the selected Pharmacy
2. Click the blue Transmit button
The Transmission Receipt confirms that the prescription has been sent to the pharmacy.
b. Transmit a Controlled Substance Prescription
1. Enter 4-digit pin number and click the Enter Pin button.
2. Click the Select Setup drop-down to choose your ID.me App setting on your cellphone.
Depending on how you setup your ID.me App for your signature, you will have one of or both of the following options.
- Push Notification: Sends a notification to your cellphone; click Yes to sign and approve the Rx you are transmitting.
- Code Generator: Open the ID.me app on your cellphone to retrieve the 6-digit one-time passcode. Enter passcode to sign and approve the Rx you are transmitting.
3. Click the blue Select Setup button.
Push Notification: A countdown will display the time remaining to approve the notification from your cellphone.
Code Generator: A window will open to Enter 2FA; Open your ID.me App, to retrieve the 6-digit one-time passcode, a countdown displays in the app the time remaining to enter the code on your PC.
3. Once signed, you will see the Transmission Receipt showing the prescription has been sent.
The newly transmitted Rx will be listed under Active Medications on the Compose Rx screen.
How to write a Custom Prescription using the Additional Sig
The Additional Sig field is where custom instructions or pre-meds can be added for the patient. These instructions will print on the label of the bottle.
1. Enter the generic drug name in the search field and click blue Drug Search button.
2. Select the desired drug strength and form to fill in the digital prescription pad.
3. Select Add’l Sig and As Directed to override the the pre-populated patients instructions fields, as follows:
- Quantity: Select Add’l Sig
- Form: Select Add’l Sig
- Route: Select As Directed
- Frequency: Select Add’l Sig
4. Enter the Dispense quantity and select any additional information needed.
- Optional: Choose the Packaging Options to select the how the medication comes packaged such as a full size Bottle, Tube, Jar
5. Enter in or Select the number of Refills, if applicable.
6. Manually type in the Patient’s instructions, up to 140 characters, inside the Additional Sig field.
| Additional Sig Quick Tip: |
|---|
|
Keep instructions short, clear and precise.
Example: Take 4 caps 1 hr prior to dental appointment Note: the “Additional Sig” field has a character limit of 140, abbreviate text as much as possible. |
7. Select the blue Prescribe button located on the upper right hand side, to review and transmit the prescription.
Mail Order Scripts
The Mail Order Scripts are composed similar to prescribing to a local pharmacy.
1. Select the Mail Order Pharmacy.
2. Fill out the prescription pad as needed for the mail order prescription.
- You can also use the Additional Scripts Feature to be filled after 30 or 90 days.
3. Transmit the prescription.